
Would someone please remind me that I need to install an air conditioner in my studio for next summer... please??
I have been out in the studio working during this heat wave, but for short periods of time, then back to the coolness of the house, while I wait for the paint to dry.
Acrylics dry by evaporation. Part of the content of acrylic paint is water and when the water evaporates the paint forms a hardened film. When the atmosphere is humid the water in the paint is not absorbed by the air as readily and the paint takes longer to dry. Alternately, when the air is dry, as in an air conditioned space, or a desert, acrylic paint dries much more quickly.
Conversely, when acrylic paints or mediums start to get thick or stiffer than normal, it's very easy to "re-hydrate" them back to their original consistency, as long as they are not too far gone. It's just a matter of adding some water to the containers, sealing them up and letting the paint or medium absorb it. I suggest that you add a small amount at a time to gradually get it back to the consistency that you prefer.
Also, when you have problems with tubes of paint... the tube splits or has started to become hard due to an ill fitting cap, I suggest that you find a small container with a lid that provides a tight seal (250 ml mason jars are one of my favourites), cut open the tube and squeeze the paint into the jar and if necessary, add water to return it to it's original consistency. So there you have it... First Aid for Acrylics!
I have been looking for the perfect clock for my kitchen for over a year now, and the other day I found it... okay, it's not really perfect, but it has what I want and can be made to be perfect!
This all started when I painted the gable end of my kitchen cabinets, beside my fridge, with blackboard paint. It looks pretty modern, especially next to the stainless steel fridge. So, I decided that the basic clock, which I believe was left by the previous owners... for obvious reasons, had to be replaced with something much more suitable and the search began. I had some ideas about what I was looking for and regularly searched, alas to no avail. Then, a couple of days ago I was poking around in a home decor store and found a rather forlorn orphan with a lot of potential. The packaging was mostly gone and what was left was damaged, the clock hands were slightly bent and there was no price on it, but it spoke to me (not quite like the Pier One Imports TV ads though!). Of course I had to ask and was pleasantly surprised to have it offered to me at half price! Wow, it had so much potential that I took it... and surprisingly it is also keeping time!
Currently it's a rather rustic rusty colour but I'm going to use silver leaf to bring it into the current millennium and make it stand out against my blackboard wall... maybe even add a little bling to it! This is going to be so much fun! Perhaps even a project to share with you in my blog!

Today's Painting Tip: Consider your light source
I find as I work on paintings and other projects that I think about what I'm doing and how I would explain it to others... typical teacher stuff! So, while working on "Dusk" I started thinking about light and it's effects on the subject matter.
In landscape painting there is usually one source of light... the sun (okay the moon if you're a vampire and prefer to work at night). As a light source it affects everything it comes in contact with... generating highlights, shadows, reflected light, rainbows and interesting effects in clouds.
When you start a painting think about where the light emanates from. Is it from the high left, the back centre, from behind the artist or somewhere else? This information will effect where your shadows fall, where the highlights are on your vegetation, buildings etc. It will also effect your colour selection for the various areas of your painting.
Clouds, well clouds are particularly interesting because the light source is above them and therefore the shadows are on the underside of the clouds, with the billowy white highlights at the top.
In still life and portraiture there may be several light sources because the stage is artificially set, but only one is the main (brightest) while the others are supplementary to create interest in what might become dark dead areas.
Without light we see nothing, so it's worth taking an up close look at how light effects what you are working on... My best advice... paint what you see, not what you know!
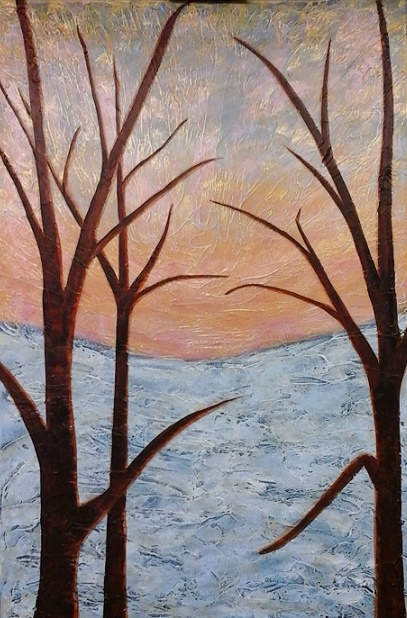
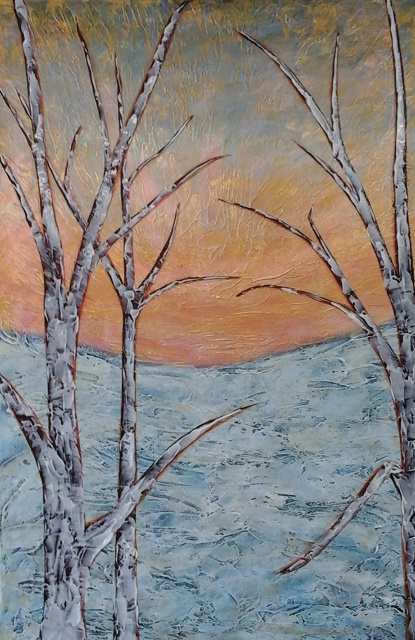
Painting Update: Dusk
Last week, for all intents and purposes, I finished the background of the Dusk painting. This week I started working on the foreground and painted in some trees. I started with Burnt Sienna and when that was dry I used Burnt Umber, leaving the Burnt Sienna showing where the light hits the trees. I am treating the light source as central in the painting. Then, to create additional dimension I applied a layer of Gel Medium to the trees, creating texture to increase visual interest down the road. I applied the gel with the back side of a painting knife, which gave me excellent control.
So now I'm back to waiting for stuff to dry!
Best wishes,
Susan
 RSS Feed