Susan Ashbrook - artist and teacher
  • Home
  • About
  • Gallery
  • Fall Programs
    • PROGRAM INFORMATION
  • Testimonials
  • Ashbrook Creative Products
  • Blog
  • Contact

TIMES, THEY ARE A-CHANGIN... encore un fois!

6/28/2016

3 Comments

 
​Change is constant, especially in these times of ever-advancing technology, but here's one change that I wasn't expecting, although in retrospect, I'm not surprised.
 
The trustees at the Ottawa-Carleton District School Board have voted in favour of cancelling all of their continuing education adult night classes, effectively immediately. Everyone involved in organizing and teaching the classes were taken completely off guard.
 
It was only a few years ago that the Ottawa Catholic School Board stopped printing and distributing their catalogue of evening classes, and as a teacher there I saw the enrollment decline to the point that classes no longer ran.
 
It appears to be an economic consideration with both boards being strapped for funds and the ability to balance programs, staff and student needs.
 
I lament the loss of these teaching venues because this is where I made new friendships, helped new students and enjoyed the sheer pleasure of seeing the "AHA" moment at it's finest... in the eyes of a new artist.
 
So, things have definitely changed and now I'm looking at possibilities for other options and venues for reaching a new audience of art enthusiasts. I will be spending a good portion of my summer working on this, but if any of you have suggestions I would very much appreciate hearing from you. Thanks!
Today's Painting Tip: Brushes
I use synthetic brushes in all of my media. I like the fact that they are inexpensive, function well and are easy to maintain. I recently purchased several brushes from Royal & Langnickel's Zen and Moderna brush lines. I was attracted to these brushes because they are available at DeSerres for $3.69 each for all sizes. In my work I use larger brushes so this was a bonus for me! Mind you, even at $3.69 the smaller brushes are less expensive than other brands.
 
The Zen series come with three slightly different "springs"... stiff, medium and soft. I personally don't notice much of a difference when using them, however others might. The Moderna brush was of similar spring and comfort of using, but the ferule separated from the shaft and I have not been able to find it since. It's probably just a fluke but I have not purchased additional brushes to see if it was an isolated incident.
 
Whenever I have to go to Michael's for products that I can only get there, I always take a look at their pricing on various products. Here's what I found on the Royal & Langnickel brushes... they start at about $3.50 for the smaller brushes and go up to $6.99 for the larger (1") ones, so choose your brush venue carefully and, if you are going to Michael's, go armed with coupons!
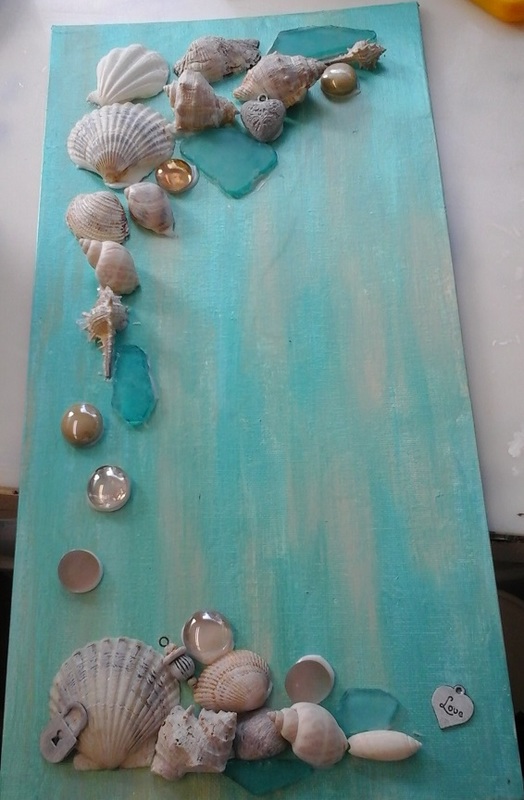
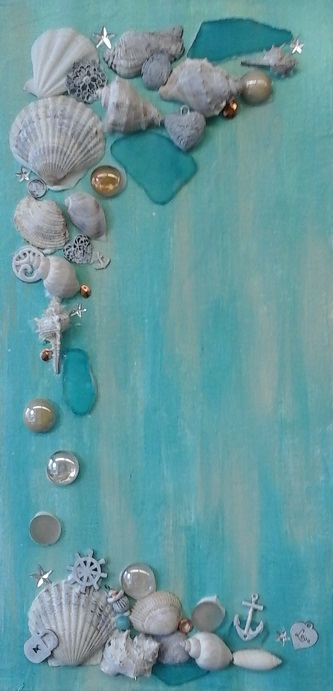
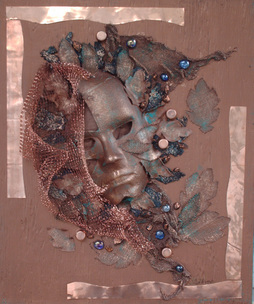
Painting Update: A new mixed media seashore piece
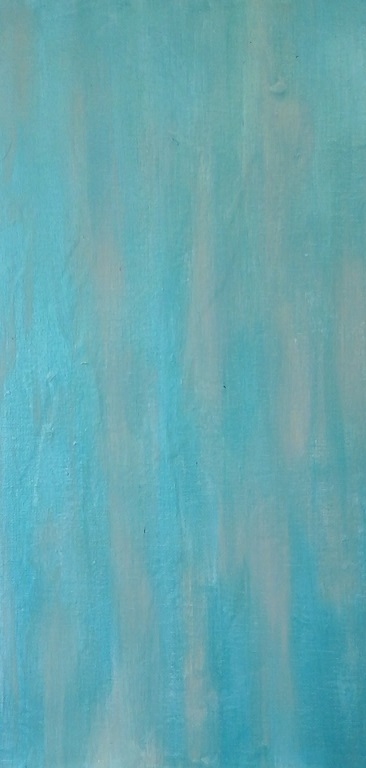
I've had a lot of fun with this new piece, which started by applying white gesso to a canvas board, thickly and with a palette knife to create a slight vertical texture. Once that was dry I applied s coat of paint, using Pebeo's Iridescent Blue Green and Golden's Titanium Buff, to create the suggestion of a weather worn painted surface, such as one might find at the coast.
 
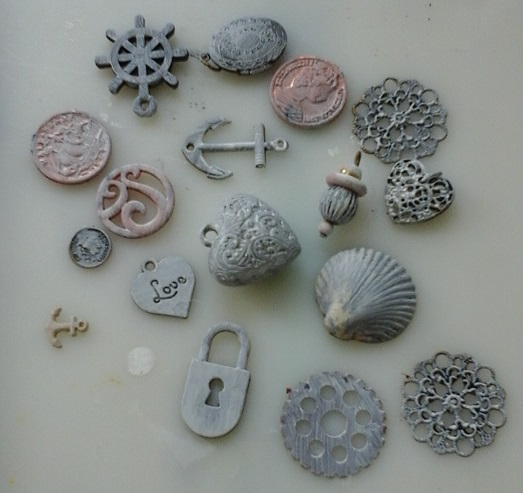
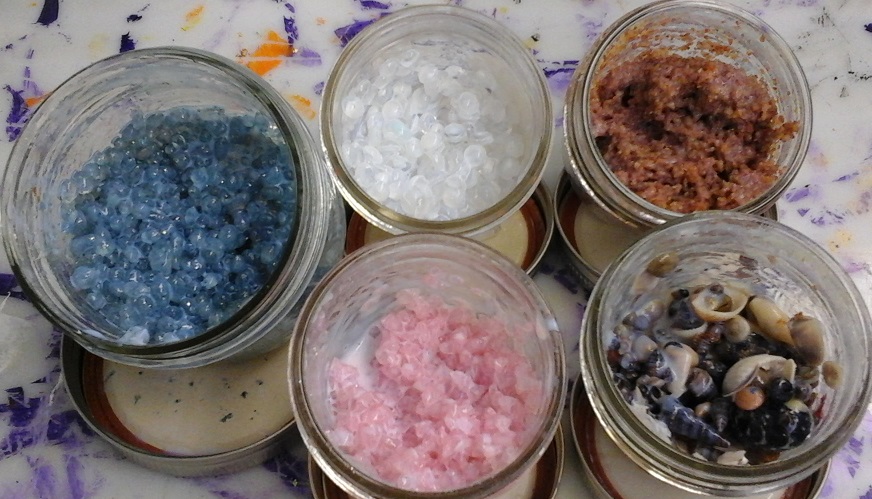
While that was drying I brushed a coat of white gesso over all of the pieces that I was going to include in the work... just to tone down the various colours of the pieces and make everything more unified. Some pieces did take two coats to meet conformity.
 
Once that was done and the background was dry, I started arranging items to create a design. It just wasn't working for me and in a flash of brilliance I realized that all the pieces I was working with were much the same size. There was no variety, no melody, just a bunch of very similar notes that weren't working well.
 
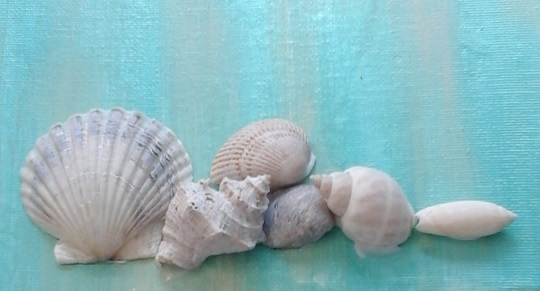
Okay, so I wiped everything off the board and started again, this time searching my stash for things that would work. Found some larger seashells, some turquoise beach glass and some flattened glass beads in the colours I needed. This is working better now! I started with the seashells as they were the largest and I could set out the design with them. Then I added some beach glass to accent the shells and help create the composition, followed by the glass beads.
 
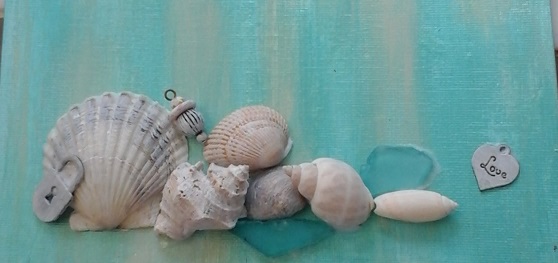
Once that was done I started adding the fun pieces, anchors, hearts, ships wheel and other interesting pieces. Then I decided that it needed a bit of bling and added a few copper coloured accents as well as some glittery stars, to create visual interest and enhance the composition.
 
There's still a lot to do, but it will be finished in next week's blog, so stop by and check it out, or subscribe to be notified of new blog posts!
 
Thanks and best wishes,
Susan
3 Comments

Planning for Future Events

6/23/2016

4 Comments

 
​Busy week, but when isn't it? This week I had classes at all of my retirement residences. My local group at the Cumberland Lodge, having recently had a very successful art exhibition, are now planning for their Christmas Bazaar and deciding what kind of projects they would like to do.  The painted glass ball ornaments were a major hit with both the artists and the visitors at the bazaar, so more of those please! The Christmas cards also went well, so we'll be doing more of those. This year they want to do some bigger projects like wreaths as well.
 
Looks like I have an enthusiastic group of entrepreneurs on my hands at the Lodge. They enjoy setting up the events and do much of the work, taking flyers around, putting notices up on telephone poles, looking after the sales themselves and then they pour all of the money they make back into art supplies for the next event.
 
This all started a year ago last winter, when I didn't get a grant that I had applied for, for a community art project at the Lodge. I was having lunch with my longtime friend and investment advisor, Lynn Cain (http://www.cainandosborne.com/)  and told her about it. She asked me how much I needed for the art supplies, as I was willing to volunteer my time, and I told her. She got 10 of her clients to donate $20 each and the project was off to the races!
 
This set in motion the first art exhibition, which was followed by the first Christmas Bazaar, and now it is an ongoing cycle. I believe in the value of art, and it's not just as a therapeutic past time. The residents at the Lodge have taken this a step further and made it their little business, in which they take great pride and also fund their future art projects. And like most artists... they are having way too much fun doing it!
 
 Today's Painting Tip: Making texture mediums
I love using texture in my work, and while there are a number of excellent commercial texture mediums available, I usually want something more specialized and original. That results in me mixing up my own custom textures on a regular basis. It's not difficult and if you store them properly, they will keep for years.
 
I start by putting my particulate into a small mason jar. I use mason jars because they come in a variety of useful sizes, the snap lids seal very well, and the snap lids and rings can be replaced very inexpensively if they corrode or get too gummed up with medium.
 
Next I start adding Self-Levelling Gel (Clear Tar Gel can also be used and to a slightly less effective mixture, Pouring Medium), and mixing it in. Start slowly, making sure the mixture is thoroughly mixed, and that you use only enough to coat the particulate. If you use too much you will end up with a sloppy mixture that will not work as well.
 
I apply texture mixtures with a palette or painting knife, either small or large depending on the surface area I am covering. Because the mediums I've recommended above are self-levelling they drip down onto the canvas creating a pool of medium for a better hold and also, while leaving a layer of the medium on top of your particulate to protect it, it's a thin layer so it doesn't hide the beauty of your particulate.
 
As you will see from the photo below, you can use lots of things to make texture mediums: small shells, assorted types of vase fillers, sand, aquarium gravel, glass beads, etc. You are limited only by your imagination. One thing to watch out for though, if you are using organic material such as dried beans, lentils, rice and the like, only mix up what you need at the time. These products absorb the moisture from the medium causing it to harden very quickly in the jar, even though it is tightly sealed.
 
By the way, if you want to clean a mason jar, pour out most of the medium, let the rest dry unopened, then soak it in a bucket of water for a day or two. Most products will come out easily after this process then the jars can be washed, dried and stored for re-use.
 
So have some fun with texture! Get creative and be original! And let me know what kind of wonderful mixtures you've created and how you used them. Can't wait to hear what you've done!
Picture
Painting Update:
With the leaf paintings finished I hauled out a partially done canvas that I had used as a demo piece at last fall's "Art School Fair", here in Ottawa. The demo had been about creating texture mediums and using them. For this piece I mixed sand with self-levelling gel for use on the beach, and plastic bead vase filler for use on the waves.
 
Prior to applying the texture mediums I had coloured my canvas to start and then applied gloss gel medium to create a textured surface gently suggesting the pattern of the waves and the ripples in the sand. Once the medium was dry enough to work I painted it with several layers of paint, the second last one being interference paint, and the final one being gold metallic paint, brushed lightly over the texture marks to enhance them.
 
The next step was to apply the texture mediums that I had mixed to the areas I wanted to accent... the waves and the beach. I was pleased with the painting but felt it was missing some interest... a focal point. I thought a starfish washed up on the shore would work, and went off to find one. I could only find ones that were too large or too small, so poked around for something else that would be suitable. I found a gold coloured metal lobster and a seashell decorated with gold coloured metal, in the jewellery department of the craft store and rushed them back to the studio so see which I liked best in the painting. The shell won, mostly because you only notice it the closer you get to the painting, and I like adding little surprises for viewers who look carefully at my work.
 
So that's another painting ready to add to my collection for the New Edinburgh Studio Tour in September. If I keep going like this I'll have lots of great new stuff to show!
 
I'd love to hear your thoughts, ideas and suggestions for future blogs. Let me know what you would like me to include.
 
Best wishes,
Susan 
4 Comments

No more pencils...

6/14/2016

2 Comments

 
​Remember this little rhyme from when we were kids?
 
No more pencils,
No more books,
No more teachers' dirty looks,
When the teacher rings the bell,
Drop your books and run like hell!
 
... Oh wait, I AM the teacher!
 
Except for my retirement residences, all of my classes ended last week. I thought I'd take some time for myself and unwind, but that apparently isn't going to happen. It seems that my Right Brain told my Left Brain to take a hike for the summer and has been flooding my head with great inspiration, which I am helpless to ignore! Oohheeee!
 
I've got some mixed media abstracts in mind, as well as some pieces using masks as the focal point, similar to my "Keeper of the Garden" piece, not to mention a couple of florals I've been working on, from photos borrowed from friends. I don't usually do florals, but every so often I see something that sets my soul on fire. These two photos did just that!
 
I've also started working on original note cards. I've wanted to do cards for a long time, but my work does not photograph well, because of all the texture, bling and metallics that I love to use. So then I thought I would have them printed and "remarque" them by adding bits of bling, metallics and texture. Well, the other day I was wandering through DeSerres art supply store and came upon some precut cards and envelopes for making original cards. "AHA!", says Right Brain, "lets make them by hand." We agreed and I purchased a package of 10 mixed media cards, got them home and got working... more about this later on in the blog... anyway it was so much fun that I'm already planning a different technique for my next ten, and then my next... next...next...!
 
This spurt of creative energy is perfectly timed as I will be participating in the New Edinburgh Studio Tour (NEST) on September 17 and 18, so I will have lots of new work to show!
Picture

Keeper of the Garden


​Today's Painting Tip: Plein Air Painting

 
Plein air painting, while it might not be your cup of tea, can only help improve your studio painting. It teaches new skills, imparts confidence and enhances your problem solving abilities. You also learn to work with a basic set of colours and equipment because toting all the stuff you have in your studio gets old real quick!
 
My first experience with plein air was a two week course at Mount Allison University in Sackville, NB. We painted for four hours every morning and four hours every afternoon. My first morning I took all four hours just to sketch my view on the canvas... just painted outlines of objects on a white canvas. I felt totally inadequate as others taking the course had finished their first painting, but each day I improved and by the end of the two weeks I could complete a painting in two hours. I had gained confidence and learned not to get bogged down in the details. It effected how I have painted since.
 
The important thing about enjoying plein air painting is to be prepared and have at hand all that you need... things like water to drink; water or solvent for washing your brushes; sun screen; insect repellant; a good hat that will protect your head, face and the back of your neck (even in the early spring you can get a serious sunburn without realizing it); of course your pared down art supply list and tools; a portable easel and/or folding stool, depending how you prefer to paint; your camera and sketch book for making notes for working back in your studio; lunch/snacks; and a knapsack to put stuff in so that it is easy to carry. Being prepared does take a bit of planning, but it makes the entire experience much more enjoyable.
 
While I was at Mount A there was an exhibition in the Owens Gallery of plein air oil sketches done by the Group of Seven. These were all 12" x 16" panels, to fit into their paint boxes. Having seen the studio paintings that resulted from these sketches, at the National Gallery, I was in awe of the sketches. They were raw and powerful. They transmitted what the artists were seeing, feeling and smelling while they painted at each location. Sadly, some of that was lost in the translation to their studio paintings, which brings me to an observation that many artists have made... when you paint plein air you are able to capture and share a better understanding of the location, than you are by working from a photograph of the same location.
 
So, if you want to experience plein air painting and the difference it can bring to your studio work, I am offering a 4 day plein air workshop here in the Ottawa area on August 2 to 5, 2016. We will meet at a central location and carpool to the day's venue. Paint all day and then return to the central location. For more information email me or check out the summer courses on my website.

Painting Update: Finished leaves and original note cards.
 
Below I have included a photo of the second maple leaf painting, which I finished this week. The process was the same as the first, which I have already shared with you.
 
The note cards started with random applications of glue for metal leaf, and then the application of variegated gold leaf. The variegation is a result of a chemical process and creates great visual interest, as you will see in the photos.
 
Then I used pouring medium, mixed with soft body paint, for colour, and poured some shapes onto a plastic garbage bag. Once the shapes were dry I peeled them off the garbage bag and glued them onto the cards using gel medium. Voila! Original abstract note cards.
 
Hope you enjoyed this blog. Please let me know if there is anything you would like me to write about, and don't forget, you can subscribe to receive future blogs by going to my website, clicking on Blog and entering your email in the box on the lower right hand side of the page and clicking on subscribe. You will receive and email from "Feedburner" asking you to confirm your subscription. Once you confirm you will receive notification of new blogs, and of course, you can unsubscribe at any time.
 
Best wishes,
Susan
2 Comments

​It's June 2016, or is it?

6/9/2016

2 Comments

 
Okay, who turned off the heat outside? Brrrrrr! In an effort not to turn on the heat inside I'm buried under a blanket while writing this. Okay, I can hear you giggling!  Say, did you know that June 8 is the first official frost free date in Eastern Ontario? Just some trivia from my horse and farming days. Well, on the other hand, no matter how cold it is, at least we know that there won't be any frost! Brrrrrr!
 
Last Acrylic Abstraction class Wednesday evening at Glebe Collegiate Institute. My students never cease to amaze me with their talent and enthusiasm. This class was no different. All have been producing excellent pieces and feeling much more comfortable experimenting with ideas, and that's what it's all about. My philosophy is that it's great to experiment and if it turns out well, frame it and sell it... if it turns out not so well, throw it back into the pile for painting something else on. Quite often a failed piece is only failed until you apply another technique on top of the failed one, creating a layered effect and redeeming the original failed piece.
 
Actually, I think that might make a great one-day workshop... bring your failed pieces and let's make them part of a successful work of art! What do you think? If you like the idea let me know. If enough people like it I'll make it happen. It would be a lot of fun, don't you think?

Thursday was the last class in the spring session of Acrylics and Oils and also my evening Beginners Painting Class. It's always fun to hear what students have planned for their summer, but it's also sad that some will be moving away. Goodbyes are said, phone numbers exchanged and new friendships are formed.  

In between my classes today I stopped in at the vernissage of an art exhibition put on by a number of my former students: Darlene Provost, Anny Huber and Josée Larocque (also joined by Joanne Beaubien, Norm Goddard and Robert Gudgeon). The exhibition is at Urban Ottawa Art, 115 Beechwood Avenue in New Edinburgh and worth going to see. There is a "Meet and Greet" on Sunday, June 12 from 2 to 4 PM.
 
Today's Painting Tip: Hard and soft edges.
 
When I was into my ultra-realism work I faithfully reproduced photos on canvas. Lots of hard edges, as cameras are want to produce. Since then, thanks to learning more about advanced composition, and I don't mean the composition using mathematical formulas and geometry, I came to understand how changing edges can really improve a painting.
 
Here's a little exercise that can help you understand. Focus your eyes on your actual subject matter and then pay attention to what you see in your peripheral vision. If you keep focussed on your subject you will notice that what is in the periphery is less defined with softer edges. By recreating that in a painting it helps to draw the viewer to your subject matter... what you are showing the viewer, what story you are telling.
 
Softer edges can be broken lines, rather than hard lines; they can be blending of colours; they can be the cooler, grayer colours and diminished definition of aerial perspective. They can be a soft shadow rather than a hard shadow created by a strong light source. In the end, it's all about varying hard and soft, strong and weak, bright and subdued... a variance of visual delights for the viewer of your work. It will keep your viewer interested in your work for longer, perhaps even to the point of making a purchase.
 
Painting Update:
 
While I have been working on a second maple leaf painting, it is not yet ready for publication, however, I did promise a maple leaf painting and I have one to show you. 
Picture
Best wishes,
​Susan
2 Comments

    Susan Ashbrook

    I enjoy sharing my knowledge with other people. I teach oil painting, a variety of acrylic painting techniques and business of art classes. My workshops are offered through the City of Ottawa, Visual Arts Centre, Orleans, Ottawa-Carleton District School Board, and the Frederic Remington Art Museum in Ogdensburg, New York. I also offer workshops in my studio in Cumberland, (Ottawa) Ontario.

    Archives

    May 2017
    April 2017
    March 2017
    February 2017
    January 2017
    September 2016
    August 2016
    July 2016
    June 2016
    May 2016
    January 2016
    December 2015
    November 2015
    October 2015
    September 2015
    August 2015
    July 2015
    June 2015
    May 2015
    April 2015

    RSS Feed


    Enter your email address:

    Delivered by FeedBurner