Susan Ashbrook - artist and teacher
  • Home
  • About
  • Gallery
  • Fall Programs
    • PROGRAM INFORMATION
  • Testimonials
  • Ashbrook Creative Products
  • Blog
  • Contact

This Hour Has Seven Days...

7/26/2016

1 Comment

 
​What a great name for a current events TV show, and this past week which has been busy with preparations for the September 17 & 18 New Edinburgh Studio Tour (NEST). There was a meeting on Wednesday evening to go over what's being done and make more plans and I've been busy revising my media lists for promotion. I must say that it's been a while since I last did it and only a few of the names remain the same. It also made me aware of how the media has changed over the years. Used to be that there was print, radio and TV media. Period. Now we have print, radio, TV, online media and bloggers, not to mention emailed newsletters such as Artengine and the arts councils. I also remember when media releases were mailed, then faxed and more recently emailed, but now you can also fill out forms online with your information to submit to the media outlets. Way too many choices! Way too much work!
 
There was also the duty of contacting potential sponsors to cover printing costs. It's not my favourite job, but it needs to be done! And speaking of printing, I offered to get quotes from my printer because the prices they were getting seemed high to me. And of course, along with the quotes came stock samples that needed to be picked up and dropped off to the committee. So it has been busy, but there's nothing wrong with that! Right?
Painting Tip: Composition... developing a focal point
 
There's a lot of things to consider when dealing with composition in a painting or drawing and developing a focal point is one of the important ones. There are, of course, many ways to do this and today we look at one of them.
 
When working from photographs many people try to duplicate the photograph, verbatim. The problem with photographs is that the cameral lens sees the entire scene with a sharp eye, whereas, the human eye sees what you are looking at sharply, but what is in the periphery is less focussed with softer edges and less prominent colours. Cameras are great tools for gathering resource material, but it's what the human artist sees that creates the most captivating paintings... the ones that engulf peoples' imaginations... the ones that sell!
 
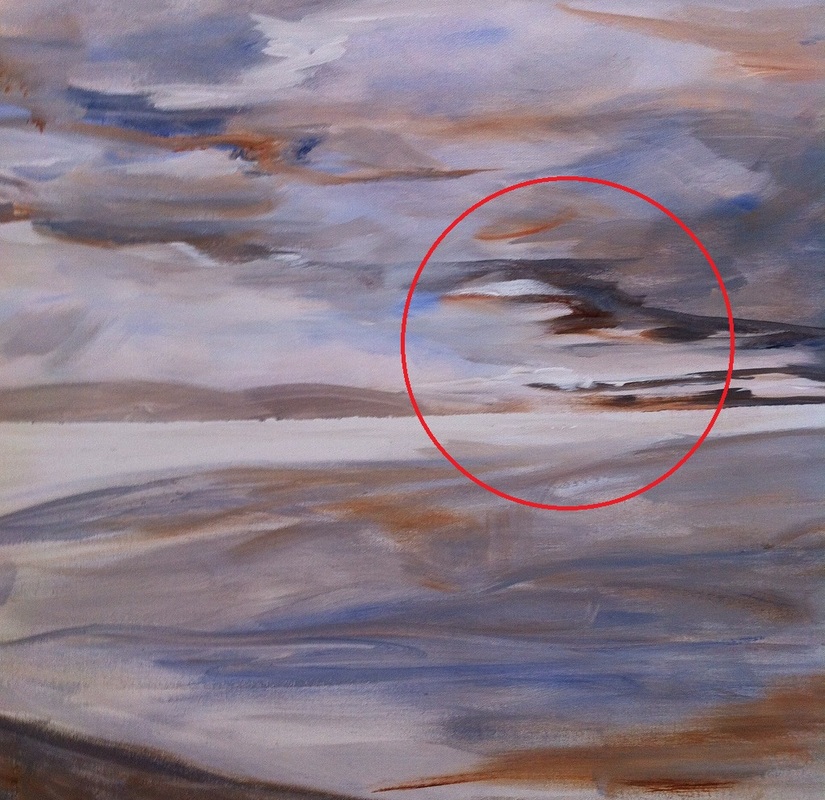
If you are painting a scene of water, land and sky that doesn't have any specific focal point then you need to create one. In the painting below, artist Karen Dyrda has created a focal point using an area of bright light next to the darkest clouds. This creates a contrast between the lightest and darkest colours which draws the eye towards it. Karen has also included more definition and hard edges in her centre of interest (red circle) and then softened the edges, colours and contrasts the further away you get from it. Notice how she has left detail out of the foreground so as not to impede the viewer's eye from getting to the focal point. Nicely done!
 
Canadian artist, Charles Spratt has an interesting way to get an artist to focus on their focal point or centre of interest... he asks "What are you showing me?" Of course in this case it is the light coming through the dark clouds, not the sky or the bit of land in the foreground. 
 
Even if you are doing a very detailed piece it's always a good idea to soften edges, colours and contrasts around the outside edge of the canvas as this will help keep the viewer's eye from inadvertently wandering out of the painting.
 
Special thanks to Karen for letting me use her painting to illustrate this painting tip! You will be able to see her work at NEST  in September as we are sharing a studio at 255 MacKay Street.
Picture

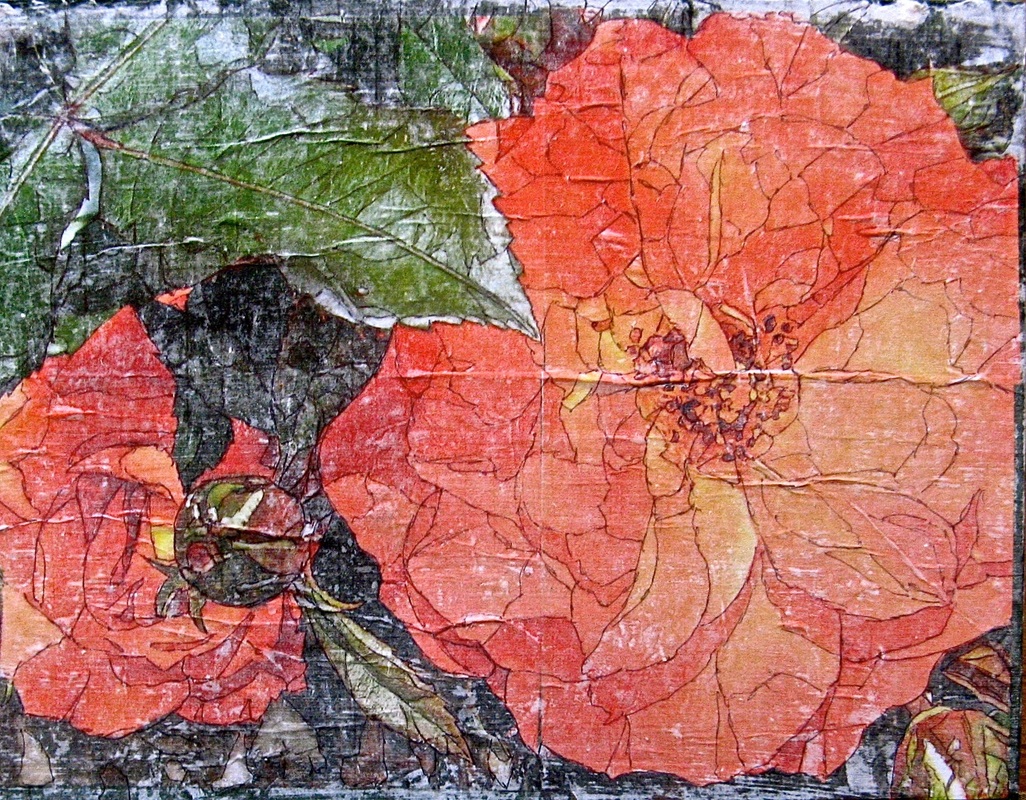
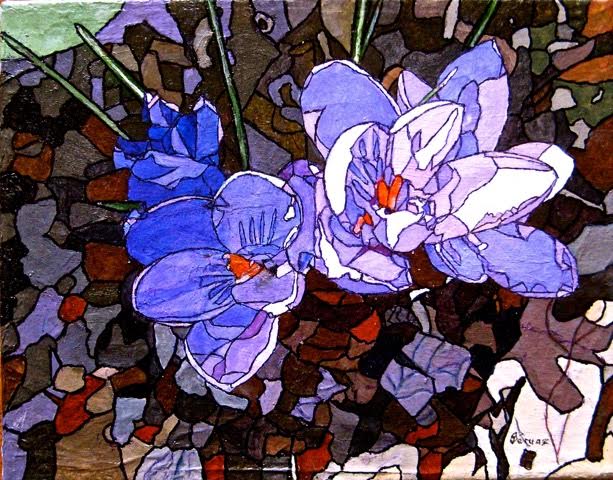
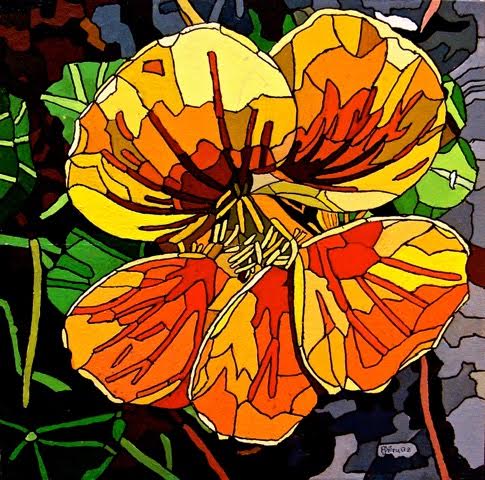
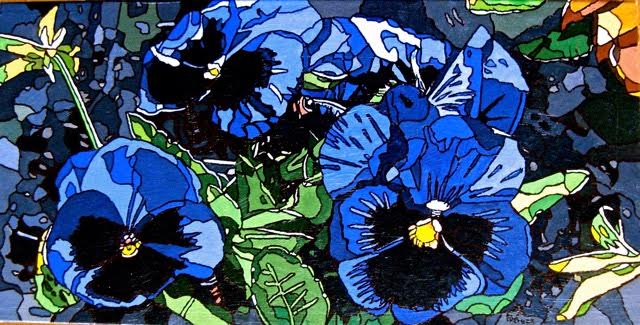
​Guest Writer: Erika Déruaz on her Fractured Flowers


The idea of fractured flowers came from stained glass that has always fascinated me. For my paintings, I use direct transfers of my own photos, transferred straight on the canvas. On the computer, I crop a pleasant picture and calculate the size of the pieces I need (for example a 16” x 16” canvas needs four 8”x 8” pieces). Carefully, I divide the picture into the pieces and print them in the desired size in mirror image on basic white letter paper.


The transfer is done by spreading Soft Gel Gloss over the canvas, using it generously to get a good transfer. Start from the middle and work out to the sides getting rid of the bubbles which prevent the ink from transferring. Be careful not to get any gel on top of the paper which will make it un-removable.  

 
After this has thoroughly dried, you can start removing the paper by wetting it and rubbing it off. Start from the middle and work out to the sides but don’t soak the paper all at once. When all the paper is removed, let the work dry and apply a coat of medium, I use GAC100.

Picture
​Then the fun begins. With a black pen, I carefully outline all the different colours and shades. When this is done, the first coat of paint can be applied.  
Picture
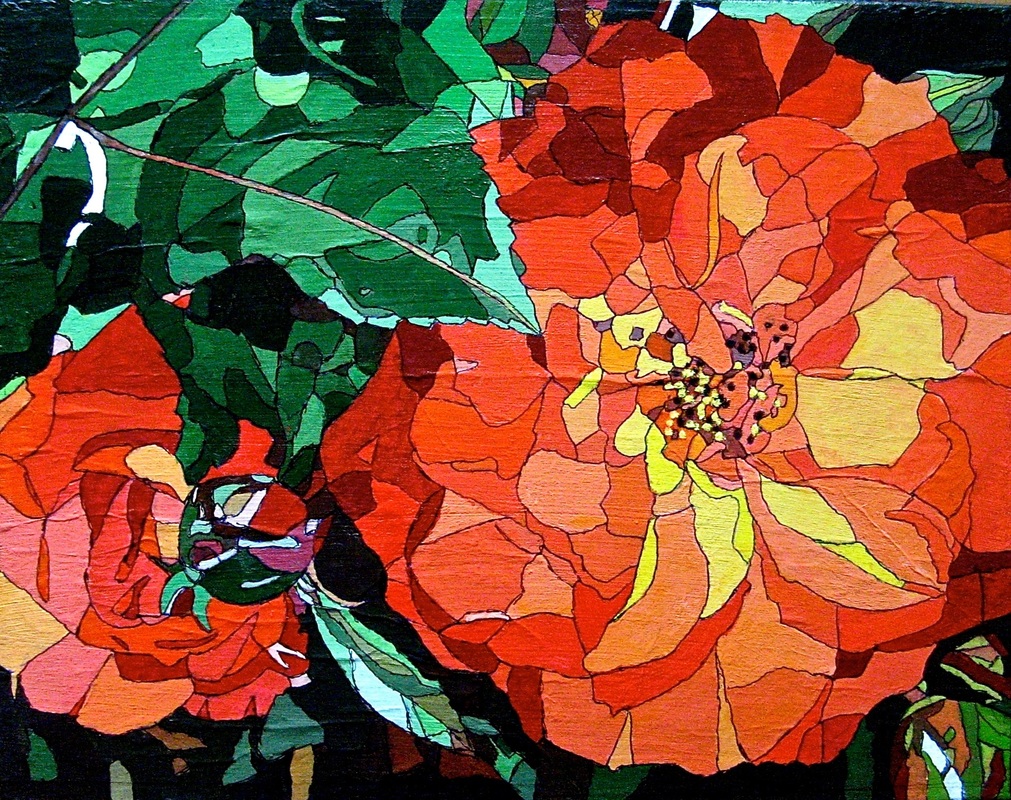
​Usually, I then leave the painting for a day or two to get some distance. The next, final layer of paint must cover all the uneven spots and bring the picture to a pleasant whole. With a black, permanent marker of medium size I then outline all the colour fields carefully, giving the painting the appearance of stained glass.
Picture
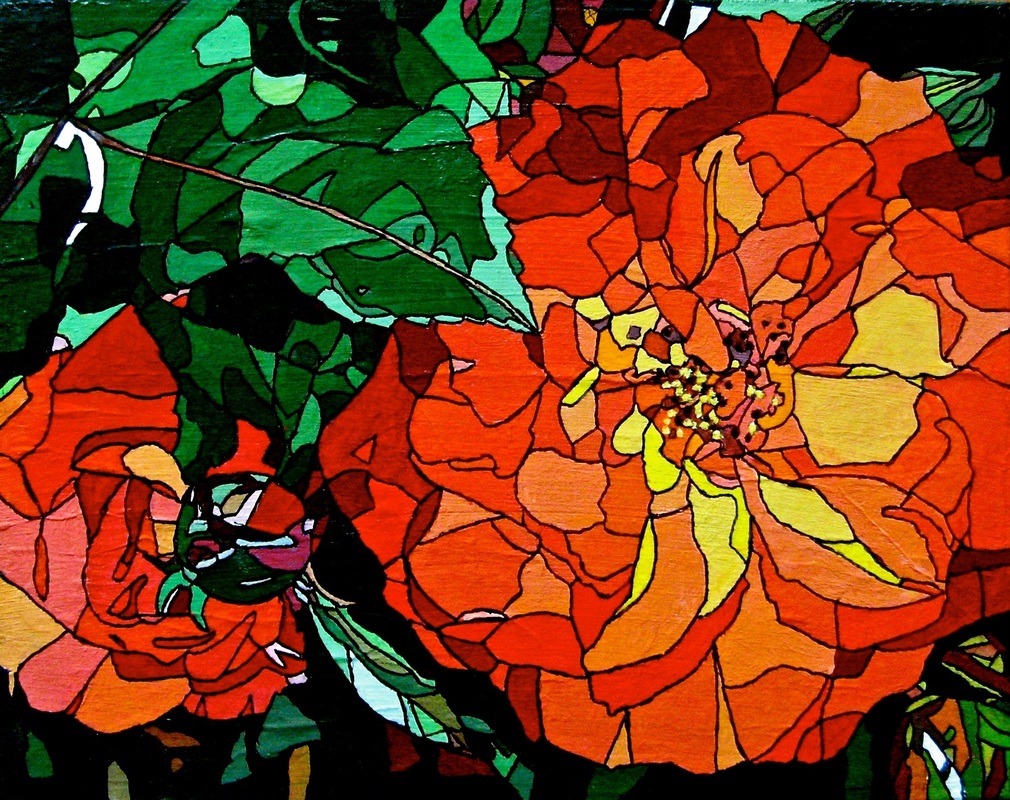
 Next I apply an isolation layer of polymer medium thinned with 25% of water or just GAC100 which gets the painting ready for varnishing, framing and hanging!

 
If you have any questions or comments for Erika please respond by clicking on the orange "comments" link at the top right or lower left of the blog page and she will respond to you. You can learn more about Erika, and see her artwork at www.erikaderuaz.com/
​So that's it for this week. All comments and suggestions for future topics are welcomed, again, by clicking on the comments links and letting me know. 

Best wishes,
​Susan      
1 Comment

I Missed You Last Week!

7/19/2016

0 Comments

 
​Sorry, no blog last week due to the lack of my computer, which was in the hospital all week after doing some very strange things. I had my tablet so I could still access my email and the internet but not my files on my computer or some of the functions and software that is not on my tablet. Anyway, I'm back now, but it got me to thinking... what would we do if the Internet ceased to function?
 
I remember a previous lifetime when I had a flower shop. The swipe technology for credit cards was new then (yup, it was that long ago) and from time to time the machine went down. This particular time one of the young members of my staff told a customer that she could not accept the credit card because the machine was not working. "Whoa!" I said, use the "zip, zip" imprinter machine, which we still had, and even if we didn't we could have taken the card information, gotten the customer's signature and processed it later. But what is the backup if the Internet goes down?
 
We do so much of our communicating and business online these days... some people even store their documents in the "Cloud", but what do you do if you can't access the Cloud to retrieve them?
 
Okay, if I need to order silk scarves for a workshop I could pick up the phone and place the order; if I needed to have something printed I could actually take the file to the printer instead of emailing it; snail mail is still available for paying bills and other communications needs... as is the phone; there's still TV, radio and newspapers to catch up on the news events; entering art competitions would go back to applying by mail; and I would have to go back to printing and snail mailing my newsletter, class brochures and invitations to events.
 
It's an interesting ponderance though and I'm sure we would find ways of doing the things we need to do, but it does show how our lives have been changed so much by technology... in such a short space of time.
This Weeks Painting Tip: More Acrylic Mediums
 
Gel mediums
These mediums are similar to liquid mediums in many of their properties, with one notable exception... they are thick and hold their shape. This allows for adding texture and depth. They come in a variety of viscosities from soft gel to super heavy gel with a range of viscosities in between. Again gloss dries clear, matte dries slightly cloudy, although quite cloudy if you are using student grade gel medium… so watch out for that when purchasing.
· To thicken paint
You can save some money on expensive paints, either soft or heavy body, by adding them to some gel medium and mixing them well.
· To use as glue
These mediums make great glue for adhering heavy weight materials in your work, such as cardboard, heavier fabric, shells, buttons etc.
· To create dimension
Mix some colour into a gel medium and then extrude it using a cake decorator’s icing bag to write words in your work, or create a dimensional stencil applying the gel over the stencil with a palette knife.
· To create skins, transfers and appliqués
Amazing acrylic skins can be made with one or two layers of gel medium with or without colour mixed in. You can build up layers to create a thick skin and then cut it into tiles to use in a mosaic. Appliquéd things like leaves can also be made using gel medium, finished and applied to the work using gel medium as glue. Image transfers are wonderful to add to your artwork and gel mediums are just the ticket to create them.
· Impasto painting
Get all the body you need for this type of painting, without spending a fortune on paint! Because many gel mediums dry clear the beauty of the paint colour shows well.
· For use as a binder with powdered pigments
Using a gel medium with powdered pigments will create heavy body paint. Mix thoroughly and store in a 125 ml or 250 ml mason jar.
· Modelling or Moulding Paste
This thick medium also allows for texture, dimension, gluing etc, the difference is that it dries white. It can be mixed with paint but it will dry the colour you see while it’s wet.
· Faux Encaustic
Matte gel mediums are also used to duplicate the appearance of encaustic wax pieces of art. The milky appearance of the mixtures create the look of wax... without the heat and fumes!
· Mason Jars
Mason jars are amazing for storing paint and mediums that you have mixed yourself. The two-part lids seal very well and as they get damaged or encrusted with stuff, are easily and cheaply replaced. Always use the size that will give you the least airspace for the amount that you are storing, and it's also a good idea to wipe the lip of the jars and the lid insert with a damp rag... this helps stop the lids sticking or letting air in, which will dry out your paint/medium.

To clean Mason jars wipe out most of what was stored in them, leave them open so that the remains dry and then soak them in a bucket of water until you can just lift out the gunk, rinse and dry them. Presto! They are ready for your next concoction. By the way, this is the time to purchase them as it is summer canning season and they are readily available.
Painting Update:  Seashell Mixed Media Piece
Well the seashell piece did finally dry, after which I applied some brushes of peach colour to it to tie the colour scheme together. After that I applied some Interference Orange paint to give it an ethereal shimmer, and finished it off with some metallic gold touches to the high points of the texture. It is now at the framer getting it's "beach wood" frame. I'm looking forward to getting it back and including it in the New Edinburgh Studio Tour this coming September.
Picture
Also, a new set of note cards finished this week... The Fossil Series based on the Fossil Paintings...
Next Week: Guest Blog
I am very pleased to announce that next week Erika Déruaz will be writing about how she creates her phenomenal "fractured flowers" paintings. I love what she is doing with them and am so pleased that she has agreed to share this with you. Don't miss it!
 
Best wishes,
Susan
0 Comments

THANK YOU!

7/5/2016

2 Comments

 
First of all, I would like to thank all of you who emailed me with your thoughts on the school board cancelling adult evening classes. I appreciate your support. I also want to thank Susan T who emailed me contact information for another educational institute that might be interested in having my programs for their students. I will be following that up shortly... because you just never know. Thank you very much, Susan!
 
Also, I appreciate the emails that I've received about my little seashell piece. It seems to have caught people's imagination. Good! Hopefully some of you will be inspired enough to try your own version of it... and maybe even send me photos of your work. That would be awesome! I'd love to feature some of your photos on my blog! And don't forget, you can always email me or leave comments on the blog site, with suggestions of the types of projects that you would like to see featured.
 
I hope you all had a great national holiday this past weekend. Happy Canada Day!, and to my American friends, Happy Fourth of July! I actually took Canada Day off. It's true, I did! It was like a mini-vacation. A friend and I took a scrumptious picnic lunch and sat in the shade of a huge willow tree at the beach. We dined, watched life  pass us by and solved all of the world's problems. A truly successful day!
 
Today I had lunch with my friend and investment advisor, Lynn Cain. She has been researching "crowdfunding" as a way to fund her favourite animal rescue charities. I've heard of crowdfunding as a way to raise funds for accident victims, the rebuilding of Fort MacMurray and other tragic situations, but it seems that it also has more far reaching possibilities, such as funding startup businesses, creative projects and product development. For those doing volunteer projects it offers an opportunity of funding that is an alternative to grants, which are often limited as so many people and groups apply. Just a little something to tuck into your mind for the future!
 
I see that the space craft "Juno" has reached Jupiter and managed to put itself into orbit around the planet without incident. That is amazing! It's a shining example of technology actually working! I'm often heard to mumble... "Technology's great... when it works!"
 
Speaking of technology, this past week there has been some discussion amongst my artist friends about the various painting apps that are currently available. If this is a particular interest of yours then you might want to check this out:  https://www.youtube.com/watch?v=HHEXBiH0TRU, and if you want to try it go here: http://www.escapemotions.com/experiments/rebelle/index.php.
 
Whatever you are doing this week, this summer, be creative!
Painting Tip: Getting to know acrylic mediums
Acrylic mediums can become very confusing very quickly. Many are so similar that they can be substituted for each other. Each manufacturer takes a similar basic medium and refines it for certain tasks and purposes and gives it a new name. Add to that the number of manufacturers of acrylic mediums each using different names… well it’s almost impossible to know what you already have that will work for you. So let’s look at some mediums and see what we can use them for.
Liquid, fluid, polymer, glazing mediums
These are basic mediums that are the most liquid of all the mediums. These are used to thin acrylic paint. Glazing medium does the same thing, but for glazing it needs to be very transparent so glazing medium is always gloss. The others all come in gloss, semi-gloss and matte. Keep in mind that matte is a bit cloudy because of the stuff added to it to take away the sheen. Gloss dries crystal clear. Some of these mediums come with UV protectants in them.
· To thin paint
I always mix the medium with 25% water because I find it makes the paint flow more easily. Use instead of water, to prevent polymer breakdown.
· To use as glue
These mediums make great glue for adhering light weight materials in your work, such as tissue paper, light fabric etc.
· As a separation layer
Before varnishing an acrylic painting it is highly recommended that one or two coats of liquid medium (I use the watered down one) are applied to separate the varnish from the paint. In the event of damage and the varnish needs to be removed for the repair, the separation layer protects the paint from being removed along with the varnish.
· To create or thicken skins
Acrylic skins can be made of any of these mediums, straight out of the bottle. They can also be applied to stenciled skins to hold all the pieces together as one.
· As a transparent sealer
Before the invention of Clear Gesso, I used the liquid medium to seal some painting surfaces, such as oak panels and various fabrics, so that the paint sat on the surface rather than soaking into the surface, while still letting the beauty of the surface show through. A couple of coats did the trick quite nicely.
· For use as a binder with powdered pigments
Many of the powdered pigments available these days can be mixed with these mediums to create liquid or soft body paints.
· And more…
I know as you become familiar with them that you will find many more uses for these versatile mediums.
​Painting Update:  Seashell Mixed Media Piece
This week I have added some rows of beads to the piece. I purchased them strung, which made them amazingly easy to apply. Using a cake decorators icing bag made of a triangle of parchment paper, I extruded an amount of gel medium the length of the string of beads I wanted to apply. Then I cut off the knot keeping them on the nylon string and laid down the number I wanted into the gel medium and holding the lowest bead in place, pulled the nylon string out. This kept the beads in a line and also kept the holes in the beads out of sight.  If some got out of alignment then I just used a palette knife to realign them.
 
Again, using the icing bag, I added some strings of gel medium. They will dry totally clear and will add subtle visual and textural interest. Finally I spread some gel medium, thinly, in areas where I wanted to apply some light aqua glass seed beads. I gently poured on some beads and when the gel is dry I will gently remove the excess by tapping the piece on my work surface, into a container so that I can reuse the leftovers.
 
As usual, this piece is now waiting for the gel medium to dry... who said that acrylics dry too fast????
 
Next week you will see the finishing flourishes of paint and the final piece.
 
Best wishes,
Susan
2 Comments

    Susan Ashbrook

    I enjoy sharing my knowledge with other people. I teach oil painting, a variety of acrylic painting techniques and business of art classes. My workshops are offered through the City of Ottawa, Visual Arts Centre, Orleans, Ottawa-Carleton District School Board, and the Frederic Remington Art Museum in Ogdensburg, New York. I also offer workshops in my studio in Cumberland, (Ottawa) Ontario.

    Archives

    May 2017
    April 2017
    March 2017
    February 2017
    January 2017
    September 2016
    August 2016
    July 2016
    June 2016
    May 2016
    January 2016
    December 2015
    November 2015
    October 2015
    September 2015
    August 2015
    July 2015
    June 2015
    May 2015
    April 2015

    RSS Feed


    Enter your email address:

    Delivered by FeedBurner