Truly an artist's paradise for a painting challenge! Sadly these magical mists don't last long as they become darker and more solid in colour as the leaves grow. So if you want to capture the magic you need to get it done when it happens... make hay when the sun shines!
In watercolour you can use a wet-in-wet technique that creates those green mists very effectively. Don't forget that watercolour lightens when it dries as the white of the paper becomes more prominent as the paint is absorbed into it, so you will want to start with enough paint to make the colour stronger than you want the finished colour to be.
To create wet-in-wet tree mists, start by mixing your various greens that you want to use, adding water to create puddles of colour. Then dampen your paper by applying clear water with a wide wash brush. Make sure that your paper is well soaked and then shake off any excess water. Next apply the colour from pre-mixed puddles, using a round brush. If you apply the paint in the middle of the cluster of leaves it will spread, creating a softer edge at the outside of the cluster. Repeat until you have all of your trees in place. Once that is dry you can go back and suggest the tree trunks and branches, and complete the scene with rocks or roads or other features that you wish to use.
If you are working in oils or acrylics you can paint your scene and tree trunks and branches, then, once everything is dry, apply spring's green mist by using a glazing technique.
To create the glazes, mix the greens you want to use and then thin them with liquid medium until they are transparent. Apply with a brush to the areas you want. You can soften the edges by mopping up some of the colour with a damp paper towel. If the colour needs intensifying you can add more layers of glaze, once the previous one is dry.
When painting with acrylics you can purchase a glazing medium or you can use liquid polymer medium. Both work equally well and I prefer to thin both with 25% water, which I find makes them both more workable.
For oils you can use products like Liquin for glazing, or mix your own with 1 part Copal and 4 parts odourless solvent.
By the way, if you do a spring green painting I'd love it if you send me a photo of it! Seeing what other people paint always inspires me!
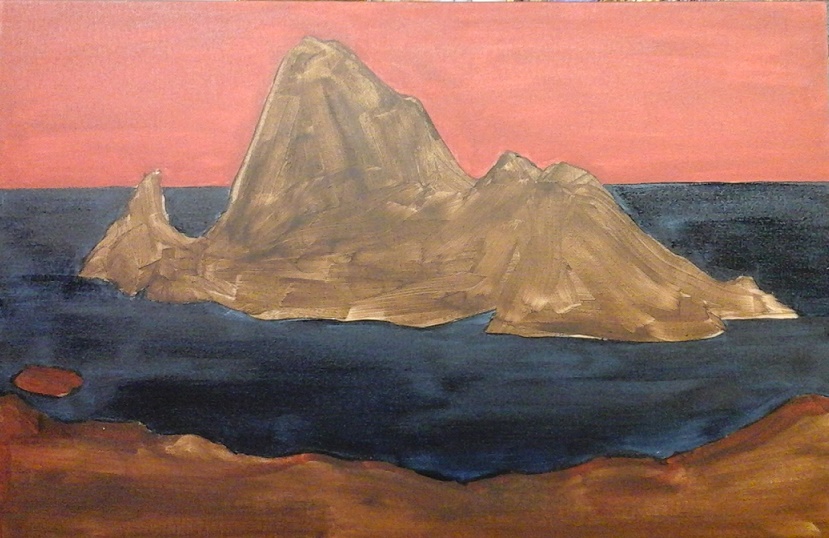
Speaking of inspiration, I recently started a new painting, from a photo loaned to me by one of my students. Jane had been working on this painting in class for a number of weeks and when she finished it, just last week, it was phenomenal! She captured the late daylight, from a cloudy sky, on the water. I was so taken with the image that she offered it to me for my own work. Thank you Jane!
My style is totally different from Jane's and I don't foresee much resemblance between our two works, but that is something that has always fascinated me... how each artist views, and produces the same subject differently from others. Just think how boring it would be if we all liked only the same thing, only the same way.
Today's Painting Tip: Mixing Greens
Most artists that I know do keep tubes of green paint in their paint box, but it's not actually necessary, because you can mix a whole range of greens from a quite limited palette of colours. In fact, quite often the green you really need has to be mixed from some version of a blue and yellow mixture.
If you subscribe to the split primary system of colour mixing, developed by Michael Wilcox, you will have two blues and two yellows in your paint box. The blues would include a violet blue (ultramarine) and a green blue (cerulean or phthalo). Yellows would be an orange yellow (cadmium) and a green yellow (lemon, hansa light or arylide light).
To mix a brilliant green you would mix your green yellow and your green blue, because the more green that is present in the colour the more green your result will be.
To mix a grayed neutral green, suitable for shadows or background you would mix the blue and yellow with the least green present, so the violet blue (ultramarine) and the orange yellow (cadmium).
That leaves the midrange greens where you mix a green yellow (lemon, hansa, arylide) with a violet blue (ultramarine), or an orange yellow (cadmium) with a green blue (cerulean or phthalo).
If you subscribe to a different colour pallette then you might be mixing Payne's gray as a blue, with yellow ochre, raw sienna or raw umber as yellows.
Whatever your palette, it's an easy exercise to lay out all of your green options by creating a grid of combinations. Put all of your blues on one axis and all of your yellows on the other axis. Where the colours intersect, put the mixture that you attain from mixing the two colours.
When lightening greens, use your green yellow (lemon, hansa, arylide) rather than white. Titanium white makes greens look chalky and artificial.
If you prefer to keep tubes of green paint in your paint box then you need a yellow green and a blue green to be able to create depth and great paintings. Viridian green is a good blue green and my personal favourite is sap green light for the yellow green, just be sure it's a lightfast version.
Thanks and best wishes,
Susan
Here is stage one of my interpretation of Jane's photograph.


 RSS Feed