
This blogging thing is an ongoing learning process for me. Catherine Wray Gutsche, my amazing web designer (Calico Communications: http://www.calico-com.com/), sent me an email the other day, in which she suggested that I tell my readers to click on the title when they receive my blog notice. This takes you to the website, where you can read it, subscribe and also, more importantly, leave comments.
I'm counting on your comments to help me move the blog in the direction that works best for both you and me. I want to hear what you would like me to write about, comment on, and also submit your own experiences that relate to my topics. Send me photos of your work because I'd just love to see it. Let me know if my painting tips have been helpful. As I said before, this blog is not so much about me, but about what you want to learn.
On another note, my sister Valerie, who with her husband Sab, owns The Cuckoo's Nest, (http://www.thecuckoosnest.ca/) in Westboro Village, in Ottawa's west end, has commissioned me to do a pen and ink sketch of the old Westboro Town Hall. She plans to have it printed on the popular stone coasters that she carries in the store. I'm looking forward to it! It will be a fun change of routine!
Today's Painting Tip: A request by Marilyn
Painting rain and rainy windows
Painting rain is a bit like painting glass. It's there and it's real, but it is clear, transparent and messes with the light. As such, since you won't be painting every raindrop, try setting the stage with a rainy mood. Use more neutralized, subdued colours to transmit the grayness of the day. Use lots of reflections on the ground and horizontal surfaces to indicate the build up of rain water. Think about things like where would water overflow an eves trough or junction of roof planes, to show how much it is raining, and then create your painting.
Once you have your painting pretty much done it is time to add your rain. Start with a round brush and load it with white, toned down with some gray and start applying short, light strokes, quickly, in the direction the rain is falling. The strokes should all be in the same direction. You don't need to apply large quantities of these strokes of rain, but rather suggest it and let the viewer's brain fill in the rest. Those in my classes get used to me telling them that less is more, and if you do too much it becomes artificial looking. Don't forget to put some splashes of white where the raindrops hit the water on the ground, or even little wave rings where the drop hits. Again, here and there rather than for every drop. Less is more!
If you are painting a landscape and the rain is off in the distance, as one often sees in Prairie landscapes, dry brush white or pale gray in the direction of the rain.
When gazing out over a landscape, through a rained-on window, the view through the window will be somewhat distorted by the rain. The landscape will not be a sharp as if the window was dry, so soften the edges of your landscape to create that kind of misty feeling. Again, cooler, grayer colours will help create the mood.
Once you are ready to paint the rain drops running down the window, treat them as you would clear glass or water droplets. Don't paint the rain, paint the shadows and highlights. In some areas the background will show through and in some cases there will be white highlights and deeper gray shadows. Again, more is less as you don't want to completely obstruct your background with rain drops.
If you haven't painted rain before, I suggest working from photographs to get the hang of it... so that you can paint what you see rather than what you know. What you see always works better than what you know. Trust me!
Update on the Painting of Jane's Photograph:
Well the coat of gel medium to create the texture is dry. It takes about 24 hours in good weather, longer in wet/humid weather and less time in hot/dry weather.
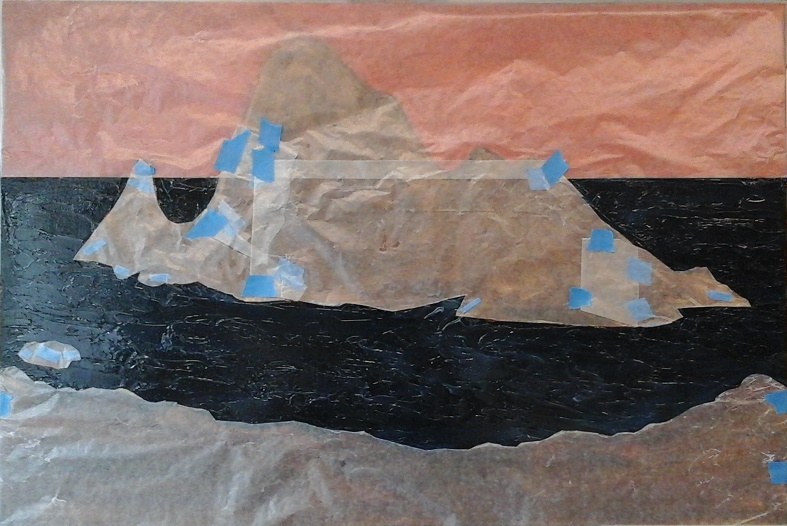
My next step (photo 1) is to mask all parts of the painting that I will not be applying gold leaf to. For this I use waxed paper and masking tape. Then I use an aerosol leaf adhesive, according to the product instructions, applying it using horizontal strokes and then vertical strokes to make sure all areas are properly covered. I then remove the masking and discard it. Drying time is usually about two minutes until it becomes tacky enough to adhere the leaf.
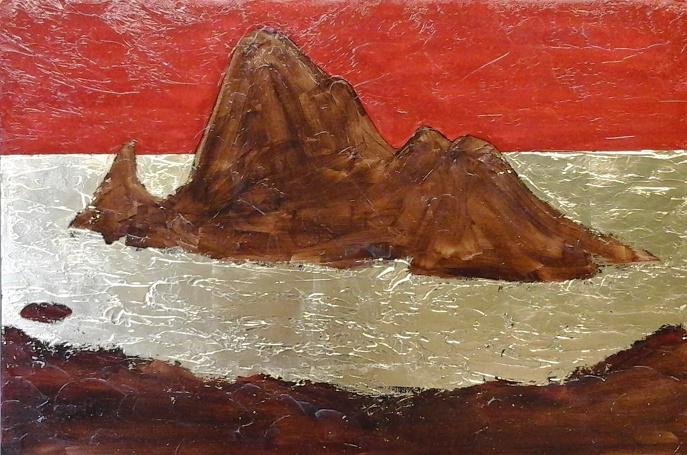
Applying leaf is quite easy as long as you take your time and follow this simple procedure. I prefer to use the leaf that is unbacked (rather than "simple" leaf that comes with a backing paper) that can be lifted easily by placing a piece of wax paper over it and pressing your hands over the wax paper. I'm not sure if it the warmth of your hand that softens the wax to hold the leaf, or if it's static electricity that causes this. Once the leaf clings to the wax paper you can easily lift it, position it and then press it against the tacky surface. Press down on the waxed paper to get full coverage on the painting and then lift it away gently. Using a paint brush gently brush it into the cracks and crevasses. You can use a stiff paintbrush to remove any leaf that is not glued down. Sometimes, if it is very warm weather you may find the leaf sticking to non-glued areas. This is easily removed by pressing masking tape to the leaf and lifting it off the painting. See the applied leaf in photo 2.
Okay, so to date we have blocked in the image in colour, added gel medium to create texture, masked and sprayed leaf adhesive and applied the gold leaf. What's next? Tune in next week to find out!
Best wishes,
Susan
I'm counting on your comments to help me move the blog in the direction that works best for both you and me. I want to hear what you would like me to write about, comment on, and also submit your own experiences that relate to my topics. Send me photos of your work because I'd just love to see it. Let me know if my painting tips have been helpful. As I said before, this blog is not so much about me, but about what you want to learn.
On another note, my sister Valerie, who with her husband Sab, owns The Cuckoo's Nest, (http://www.thecuckoosnest.ca/) in Westboro Village, in Ottawa's west end, has commissioned me to do a pen and ink sketch of the old Westboro Town Hall. She plans to have it printed on the popular stone coasters that she carries in the store. I'm looking forward to it! It will be a fun change of routine!
Today's Painting Tip: A request by Marilyn
Painting rain and rainy windows
Painting rain is a bit like painting glass. It's there and it's real, but it is clear, transparent and messes with the light. As such, since you won't be painting every raindrop, try setting the stage with a rainy mood. Use more neutralized, subdued colours to transmit the grayness of the day. Use lots of reflections on the ground and horizontal surfaces to indicate the build up of rain water. Think about things like where would water overflow an eves trough or junction of roof planes, to show how much it is raining, and then create your painting.
Once you have your painting pretty much done it is time to add your rain. Start with a round brush and load it with white, toned down with some gray and start applying short, light strokes, quickly, in the direction the rain is falling. The strokes should all be in the same direction. You don't need to apply large quantities of these strokes of rain, but rather suggest it and let the viewer's brain fill in the rest. Those in my classes get used to me telling them that less is more, and if you do too much it becomes artificial looking. Don't forget to put some splashes of white where the raindrops hit the water on the ground, or even little wave rings where the drop hits. Again, here and there rather than for every drop. Less is more!
If you are painting a landscape and the rain is off in the distance, as one often sees in Prairie landscapes, dry brush white or pale gray in the direction of the rain.
When gazing out over a landscape, through a rained-on window, the view through the window will be somewhat distorted by the rain. The landscape will not be a sharp as if the window was dry, so soften the edges of your landscape to create that kind of misty feeling. Again, cooler, grayer colours will help create the mood.
Once you are ready to paint the rain drops running down the window, treat them as you would clear glass or water droplets. Don't paint the rain, paint the shadows and highlights. In some areas the background will show through and in some cases there will be white highlights and deeper gray shadows. Again, more is less as you don't want to completely obstruct your background with rain drops.
If you haven't painted rain before, I suggest working from photographs to get the hang of it... so that you can paint what you see rather than what you know. What you see always works better than what you know. Trust me!
Update on the Painting of Jane's Photograph:
Well the coat of gel medium to create the texture is dry. It takes about 24 hours in good weather, longer in wet/humid weather and less time in hot/dry weather.
My next step (photo 1) is to mask all parts of the painting that I will not be applying gold leaf to. For this I use waxed paper and masking tape. Then I use an aerosol leaf adhesive, according to the product instructions, applying it using horizontal strokes and then vertical strokes to make sure all areas are properly covered. I then remove the masking and discard it. Drying time is usually about two minutes until it becomes tacky enough to adhere the leaf.
Applying leaf is quite easy as long as you take your time and follow this simple procedure. I prefer to use the leaf that is unbacked (rather than "simple" leaf that comes with a backing paper) that can be lifted easily by placing a piece of wax paper over it and pressing your hands over the wax paper. I'm not sure if it the warmth of your hand that softens the wax to hold the leaf, or if it's static electricity that causes this. Once the leaf clings to the wax paper you can easily lift it, position it and then press it against the tacky surface. Press down on the waxed paper to get full coverage on the painting and then lift it away gently. Using a paint brush gently brush it into the cracks and crevasses. You can use a stiff paintbrush to remove any leaf that is not glued down. Sometimes, if it is very warm weather you may find the leaf sticking to non-glued areas. This is easily removed by pressing masking tape to the leaf and lifting it off the painting. See the applied leaf in photo 2.
Okay, so to date we have blocked in the image in colour, added gel medium to create texture, masked and sprayed leaf adhesive and applied the gold leaf. What's next? Tune in next week to find out!
Best wishes,
Susan
 RSS Feed